Friday, February 22, 2013

Ginseng (Pot Belly) Ficus.


This is the typical form if of a Ginseng or Pot Belly Ficus:

This Ficus is a variety of Ficus microcarpa which have the characteristic of having thicker roots than the normal Ficus microcarpa.

All over the world this characteristic is used to grow the thick roots even fatter by using different horticultural techniques. One technique that is used is to reduce the roots to three to five roots- the more roots there are on an average size trunk the thinner the roots will be.

This characteristic can also be find on other Ficus species. Here is a Ficus natalensis that was removed from the rotten core of another tree:

It seems that intervals of drought and watering encourage this kind of roots forming - in these conditions the tree relies heavily on the stored water and energy in the "tubers".

Most of the trees in the bonsai trade have another variety of Ficus microcarpa grafted onto the roots. The other variety has greener, shinier and rounder leaves and the nodes are much shorter between the leaves as with the original species.

Here is the grafted growth on the left and the original growth of the tubers on the right:
Notice also that the tubers leaves are more prone to the common leaf distortion on Cuban-laurel caused by a little black thrips from southeast Asia. The leaf responds to the sucking type feeding of this thrips by
folding upward along the midvein. This results in a misshapen leafroll that resembles a pea pod. Here the offspring are raised in the safety of the folded up leaf.
 

The exposed fat roots are frowned upon by the bonsai community because the fat exposed roots look very unnatural. If you like the roots the crown can be shaped and it becomes a nice oddity - at bonsai shows it is usually the tree that get the most remarks........although not always very positive remarks!

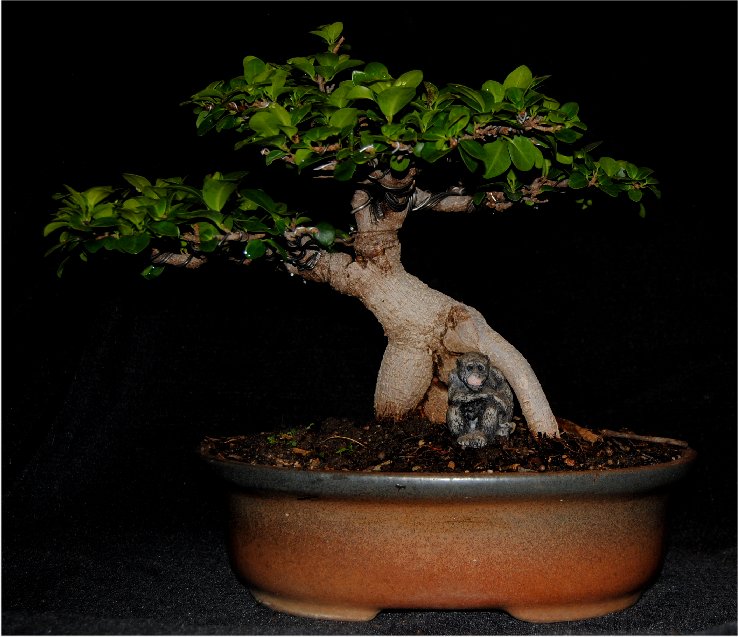
Here is one of mine I have styled:
(Side A and B, from the top and defoliated.)


Although it is true that the Ginseng Ficus, as is, does not make a very convincing bonsai, it is not true that the material can not be used to grow a bonsai.

Sometimes, by selecting the right tubers, you can have a convincing trunk:

The trunk in  beginning 2010:

Here the grafts and chop are clearly visible.

Here is the trunk today:
Notice where the third tuber was removed:

The graft is also very noticeable in this picture because it tends to form meristematic  tissue. This growth will have to be carved away or hidden by the canopy. With this experiment the crown will be shaped next summer.

Here is a pic of the removed root bearing the original species's leaves:
 
Notice the new thinner roots forming at ground level as well as the longer nodes than the grafted species. You will also note a aerial root that has fused to the old root. The new trunk will be chopped next summer to develop the tree into a semi-formal or a broom.

The fat roots can be air layered:
(Credit to Dario from Ausbonsai:  http://www.ausbonsai.com.au/forum/viewtopic.php?f=133&t=14337&hilit=ficus)

Here is the tree before with the area mark where the layer will be done:

The bark and cambium removed:
Potted up:

Removed from the pot:

The old fat roots below the layer rotted away:
The rotted area were cut away and the edge smoothed and some roots removed:
Potted up again:


Will post information on culture and other stuff regarding this variety soon


Sunday, February 3, 2013

Making lightweight rocks or mountains.

You first get the picture of your final setting in your head. In this case it is going to be one or two trees in the foreground with a far view mountain with sloping sides and some cliffs. There will be a lot of little pockets created in the mountain where moss and far view trees can be planted.

You then select a flat surface and cover it with newspapers. You can outline the slab with a pencil.

You then take a product called PU-FOAM (Spray polyurethane foam, commonly referred to as SPF is a spray-applied insulating foam plastic that is installed as a liquid and then expands many times its original size.)and do the first layer covering the newspaper. When the first layer has settled you add the second layer keeping in mind the depth of soil your bigger tree is going to need. When this second layer has dried out a bit you add the third layer. In my slab the third, fourth and fifth layer cover only the mountain area. Repeat until you get the desired height of the mountain area. Give the foam a light spray of water before adding the next layer.

When it is dry the backside of my mountain looked something(did not take a pic at that stage of this one) like this:
I then took a knife and carved the mountain area roughly into the shape I needed it to be and did the refinement with my Dremel tool:

Now you can clearly see the area where the bigger tree/s is going to be planted. The little pockets for the moss was carved out also.

I then turned it around and prepared the underside of the slab for the Rockset I am going to use to make a strong base. The foam was carved away leaving only a rim to keep the Rockset inside. If your bottom is not 100% level the rim can be build up by using Polyfilla. If there are any holes in the foam cover them with Polyfilla. if you don't do it the Rockset will leak through because the consistency of the Rockset mixed with water is almost like cream. I placed a few pots, covered with aluminum on the prepared surface where the drainage holes would be. The slab is about 6mm thick:

The bottom with some drainage holes pots removed:

I then let it dry and removed the rim that remained. I then turned it upright again placing the slab on a soft level area because the slab is not strengthened by the topside yet. I then did the refinement carving making sure some of the bigger pockets will also drain into the "pot" area. I then took Rockset again and painted on a few layers:

Here is the process 50% completed:


The foil is to prevent the Rockset to sticking to the rubber surface I placed it on and to catch up the Rockset running down. This rim forming in this foil area will strengthen the slab.

Here is a close up where the unpainted inside of the pockets are visible:

I repeated the process of painting the slab a few times until everything was covered. I believe the Rockset layer will be about 3mm thick.

I removed the foil and colored the mountain with oxide. I then sealed it with sealer looking like woodglue that would also strengthen the mountain. At this stage the mountain looks a little bit too dark but most of the dark areas are going to be planted with smaller trees, plants and moss. If necessary I could lighten it again using the sealant and oxide.

 The mountain:

If this were rock you would have a difficult time picking it up. This one can be carried with one hand.

Will post a pic of the planting when it is finished.

Another mountain/outcrop I made:
 Front:

 Back:

Top:

I am thinking of planting a bigger, but not too high tree on this one. The right hand side will show little moss but the left hand side will show a lot of greens.