Friday, December 5, 2014

Celtis - Making something out of nothing.

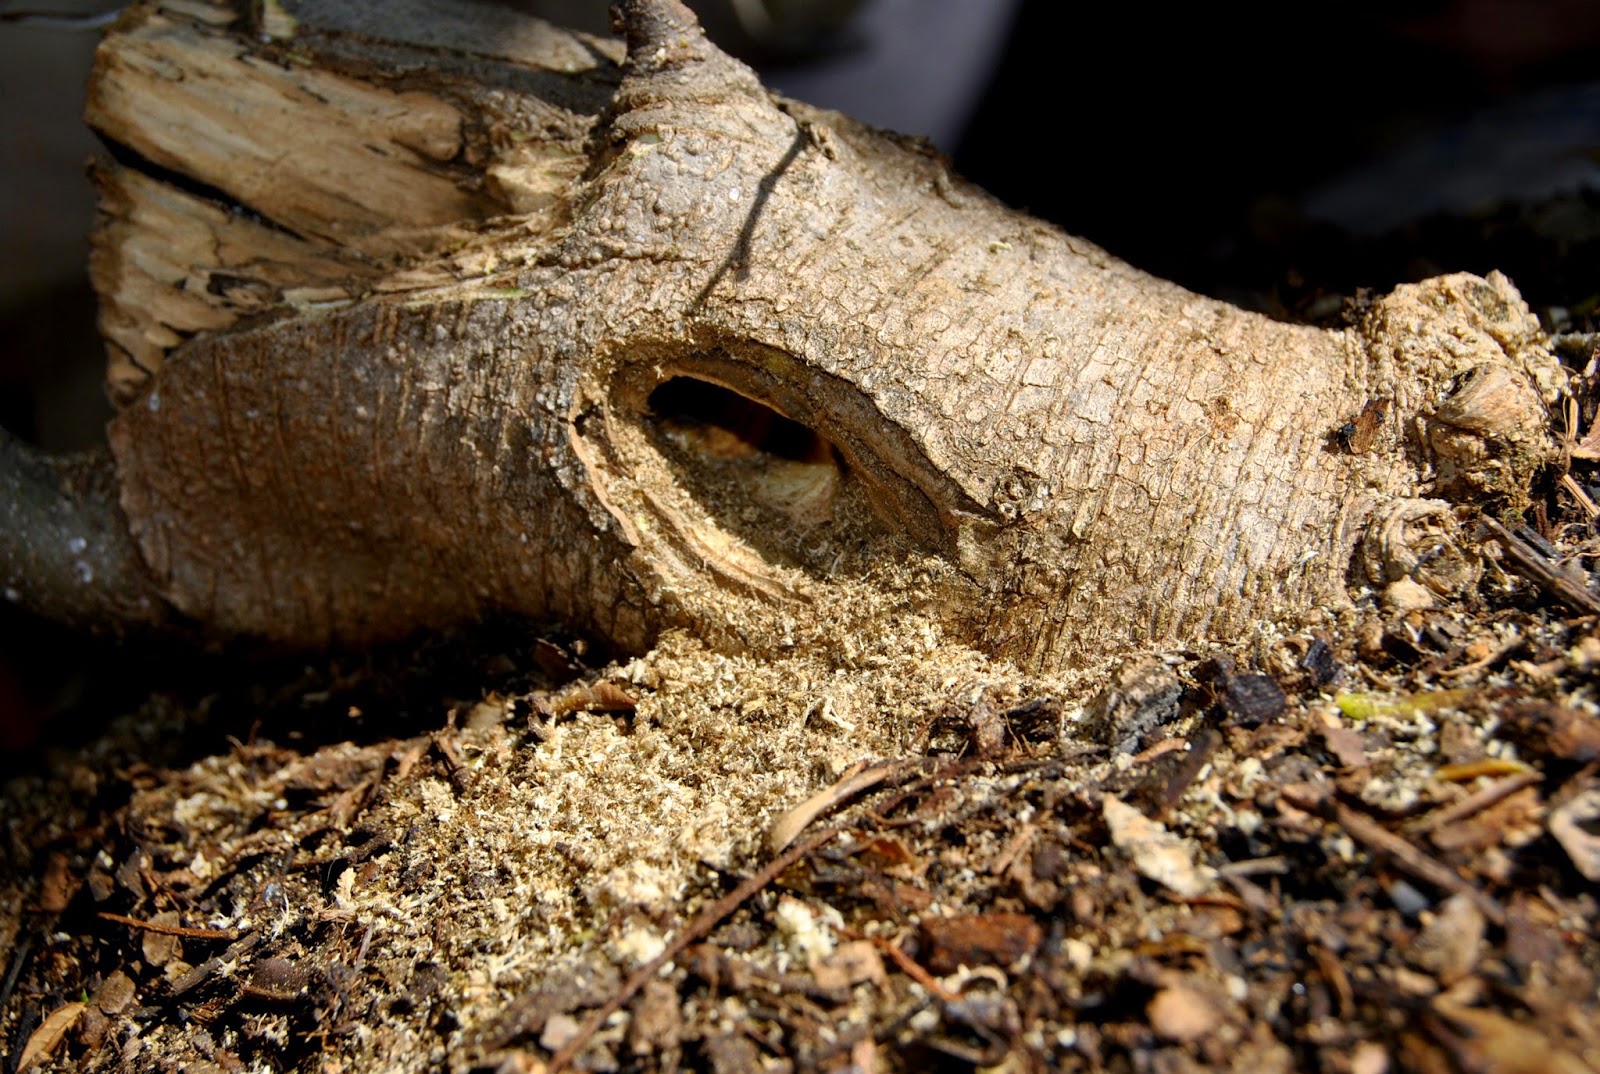
The fallen trunk is actually a very
thick root removed from another bonsai. The root was thrown under the benches but when it started sprouting new shoots it was covered up with soil.
It was removed spring 2012 from the ground, cut back for the repot and potted up in the current pot.
I am planning to portray a very big old tree that has fallen over and this all that is left after most of the old trunk died and rotted/broke/burned away. Some carving will have to be done. The t:ree February 2013


 From the before photographs have been posted the tree was planted in a little bit wider but shallower pot. The tree grew well but I did not get much thickening of the trunks and the branches.


 The tree was cut back to get some lower branches going. The tree did not respond very well. While I was on holiday for a month in December my Celtis was attack by whitefly and some sort of gnat. When I came back from holiday I sprayed all my Celtis to kill the pests.


The tree was cut back again slightly and wired. At this stage this side looks like a nice front. We still have three months of growing left – hope it will progress nicely. The deadwood on the tree will also be carved end of March 2014.

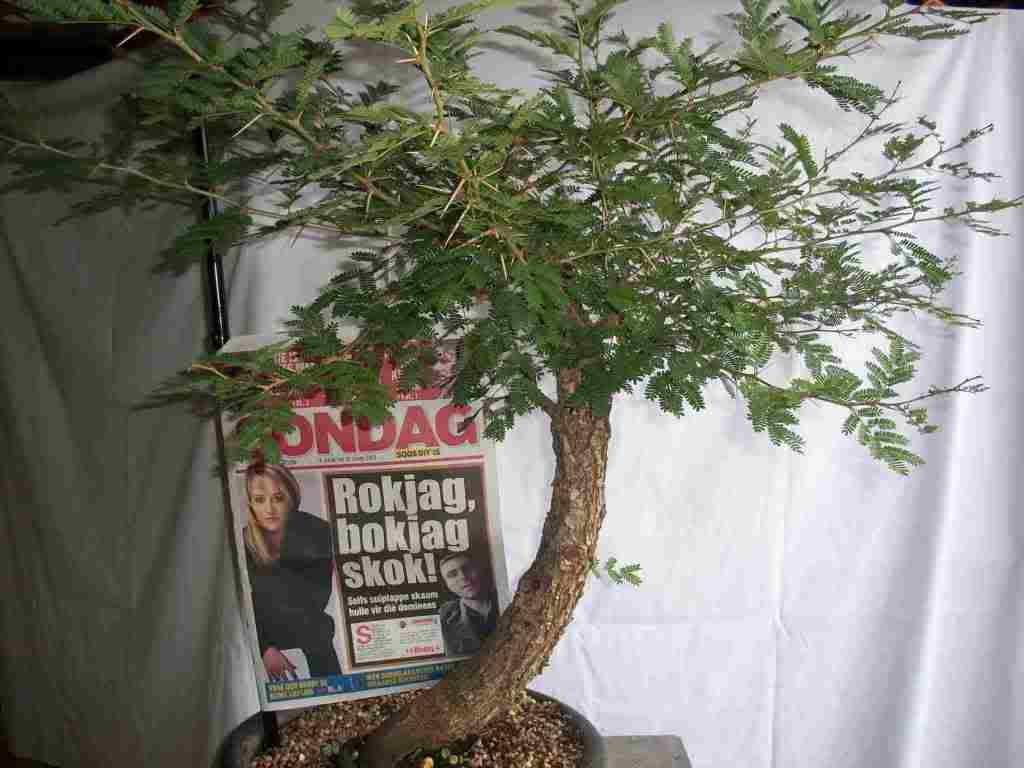
From the last pictures posted, the tree has not progressed well because the specific hybrid went into early hibernation this year – did not matter what I have tried, the tree refused to grow!
To not stress the tree any more I decided to do no further work on the tree.
My plans for the tree is still the same – it will portray a tree that has fallen and rotted and it re-sprouted three new trunks. As soon as the branches and trunks have developed I will carve the old trunk into a hollow and I will also do some work on the trunks.
I am happy with the style I have chosen and I can not wait to work on the tree summer 2014.


 Some carving done.
Making a hole for drainage: 
Connecting the hole to the front of the fallen trunk:
Some interest carved into the top of the deadwood:


The tree December 2014:


After the hair cut and some wiring:


Thursday, November 20, 2014

This is Africa progressive bonsai competition - Winners!

 THIS IS AFRICA - WINNERS!

This competition was hosted by the now closed SABONSAIFORUM. The forum was closed halfway into the competition and most of the info regarding the competition was lost. Luckily I saved most pics to my computor. I decided to let the competition go on, but a lot of the entries were not updated. The rules and category requirements were also lost. The winners were chosen by two South African and one international judge. No judge sheet was used. Judges only rated the entries on a scale of 10. The following categories were judged:

- Any species used in African style

- African species in any style

- African landscape

- African landscape penjing

- Special award

(Please note that no feedback will be given regarding the winners and the competition. The results may be published everywhere.)

The prizes for the main categories:
The prize for the special award:

The winners are:

CATEGORY - ANY SPECIES IN AFRICAN STYLE
Neli Stoyanova


Posted Image


19 December 2013
Posted Image


Posted Image

5 June 2014
https://scontent-b-ams.xx.fbcdn.net/hphotos-xpf1/t1.0-9/10313994_10201657694676197_7994243773770448535_n.jpg
Final pics:


CATEGORY - AFRICAN LANDSCAPE
 Lennard le Roux

Posted Image

28 January 2014:

Posted Image


March 2014/Final pics


SPECIAL AWARD - CREATIVITY AND TECHNIQUE

Hendrik Jansen van Rensburg


Posted Image

2013/12/09
  Posted Image

Posted Image

March 2014:

Final pics:
https://blogger.googleusercontent.com/img/b/R29vZ2xl/AVvXsEgACq6T0fJAr0n99v1gRxck7Yq0tX56eZLU9Boh6xCJTsH1wQPlxT_h5hBnhoqGEd6f1l15ejG0TPpBSo9hbuu3wUQFgoGOh-PoV22X1kzJowQ7oFFxs9TFNVi6NwA-rx8MTxviqckFTxg/s1600/aa16.jpg


https://blogger.googleusercontent.com/img/b/R29vZ2xl/AVvXsEjMXDOciuehyphenhyphen-QjXH6NGUPgN9pVsO_QY272xRo-eL_q-NYXzr95l7fTuHGoZ5GlhgbXExHLnKmCq5GFzI55Yh9cdhoBh6iNhY4ZNBeE3XHuKAaWu_UP7kQ3La7MV1cvJ5T_4GreA0r8IM0/s1600/a16a.jpg


CATEGORY - AFRICAN SPECIES IN ANY STYLE

André Beaurain


Posted Image

19 December 2013
Posted Image

Top view
Posted Image
FINAL PICS:


CATEGORY - AFRICAN LANDSCAPE PENJING


André Beaurain


Posted Image

29 November Front
Posted Image

29 November Top View
Posted Image

Final pics:


Tuesday, August 19, 2014

Brush Cherry/Eugenia - Incredible progression!

The tree was bough as a nursery grown lollypop tree in October 2011. I bought it for the massive nebari. I did not chop the tree immediately because the top had very nice potential as another bonsai so I air layered the top.

A picture of the mother plant and layered part (Autumn 2012):

I removed the air layer in October 2012. Here is a picture of the air layer part of the tree.


Here is the bottom part just after the air layer was removed:

October 2012:
 Here one can see the wide nebari and the beautiful bark of the species. The red indicates the possible new leader then.
I entered the tree in a competition in August 2013:
http://ofbonsai.org/contest/ryuga-2013/entry-eugenia-myrtifolia-brush-cherry-south-africa


After posting the pics for the competition the tree was cut back heavily to the trunk and thick growth only. The pictures showed a lot of growth but there were not much to work with.
After the cut back the tree budded out everywhere and I let the tree grow out freely to recover from the heavy cut back.
The pics show the tree after I have selected potential new growths. All growths growing downward, directly upward, growths in bends, growths coming from the same bud and growths that were positioned that would not add to the design, were removed.
I felt better about the potential of the tree then because I could picture the final outcome of the tree in my head at that stage.
The growth in the upper part of the crown will have been reduced in the first week of December to preventing them from becoming too thick. The lower growths were left alone until the second week of January before being reduced. The tree would then be defoliated and wired completely.
I was still going for an old tree in the broom style where the branches are styled in the naturalistic branch structure.


 From the last pic I have cut back all growth in the crown to force growth into the lower branches and twigs. I needed to do that to thicken up the branches and the twigs. Luckily I went on holiday so the tree had more than 30 days to grow out. This is how the tree looked somewhere January 2014:
 
I have cut back the lower branches somewhere late January/beginning February. They have thickened up nicely and because they were growing freely they suppressed growth in the crown. I also lowered the apex by cutting it back a bit. At that stage the back of the tree looked nice also.

From the last picture I balanced the growth in the upper half of the tree with the growth in the lower branches. The main purpose was to get some twiggy growth. This is the tree in late March just before I defoliated the tree, the tree defoliated, the tree wired and the branches and twigs styled. (The first three pictures.)
I tried my best to get as much movement possible in the twigs to portray the theme of an old tree.
At that stage I was very happy with the outcome of the tree.
Having only a few weeks left till the final pics I gave the tree as much sun and heat as possible to get the buds going. The tree reacted well.


14 April 2014:
I am very happy with the outcome of the tree. The tree has not disappointed me in what I have planned right from the beginning for it – when finished the tree will portray an old tree with one crown but with pads within the crown flowing into each other as one will found on old natural trees.
From here I am going to let the tree grow out a bit again to the 4th leave stage before cutting it back again. After that I will have enough twiggy growth to fill out the outline of the crown. The crown will also be a little bigger then, but wider than high. With the defoliation in early summer, the leaves will reduce tremendously – getting them at about 3mm wide and 5mm long is possible with the species using the correct technique. The smaller roots of the nebari will fatten over time adding more character to the base. Some carving, like a hollow, may also be in the future of the tree. Over time the front of the tree will probably change – lots of possibilities in its future.
When ready the tree will be planted in a light blue and brown oval pot with a pronounced lip and feet.


The tree today at the beginning of spring(August 2014):


The tree is still growing strong. I am going to fertilize it heavily over the next two weeks and then I will do the cut back to two leaves again.

September 2014:
(Before cut back and defoliation.)

After the cut back and defoliation: