Sunday, July 28, 2013

Celtis africana 3 tree 5 trunk clump style.

I have bought this Yamadori (from a guy who was selling his collection)  in June 2009. It was planted in a black plastic nursery growth bag:


The trunks are about 70cm high and the base of the trees together is about 30-40 cm wide.

 In spring 2009 I replanted it in a plastic basin after removing some roots to lower the plant in the pot.  The four biggest mistakes I made, right from the beginning, were that I did not sprayed the tree insecticide, fungicide , did not seal the chops and I damaged the tree further more to make a deadwood feature on the biggest trunk.

Beginning 2010 I cut it back heavily and and smoothed of the chops done by the previous owner.

When replanting I noticed that there are 3 separate trees. I did not separate the trees because I did not want another single tree yamadori - I rather like the feel of the trunks together. Giving the grouping a name I think it can be called a clump- or sprout style.

This would probably be the front of the tree because all the trunks are visible and looking into the gap brings some depth to the planting:

I was thinking of styling the setting "into a dark fairytale forest thing. To work, it would probably has to have a lot of its trunks visible and strange, gnarling branches and somewhat abstract foliage pads... And it should have dead moss (ochre-ish brown) between the trunks."

Some virts by friends:


The scars of the chops presents a problem - I could either hide them with the foliage or make the scars part of the setting: a 5 trunk strike by lightning clump-style group :D . The biggest trunk has a sunburned area and then I was  not sure if the bark had died there. It felt hollow when I scratch that area. Later on another trunk got sun burnt - learned my lesson well!

The sun burnt area:
  I removed the dead bark to prevent insecy from hiding in there and to prevent the root from rotting.


This is one of my Celtis that I wire this time(spring) of the year. With the bare branches it is easier to wire - although it took me the whole week working on the tree at least one hour a day. Luckily I had a lot of used wire lying around so I did not cost me much.

Although this tree have a lot of problems I do love working with it....and I think I have rid the tree finally of scale after three years of spraying! I have also sprayed fungicide because I got some mildew in June. Will repeat the spraying tomorrow to play safe - the buds are swelling very fast!

I have also repotted the tree in a wider basin and tilted it about 20 degrees to the front - the main reason for all the rewiring.

I think my main love for this tree is it's unsure future - I must keep the veins healthy to fight the deadwood decay. This is also the reason I have sealed of all deadwood. I believe the dying bark was caused by moisture entering the top cracks in the deadwood and when the trunk got baked in the sun the vapor moved in between the deadwood and cambium cooking the cambium. I have also noticed it on some other trees and now I seal everything! I also remember, as a child, that we whitewashed all the lower trunks of fruit trees to prevent them from getting sunburn after they were pruned.

My main aim this season is to fatten up the lower trunks using sacrifice twigs. I will have to make sure that the top growth is also kept healthy to protect the veins running up to there. Because the deadwood is sealed of I don't think I will have any problems in that department any more.

"I would suggest Robert Stevens "transformation" approach, based on the  concept that the upper quarter or half of the trees died, by fire/ snowstorm/ crashing airplane etc. and they have since returned to health, which is what you will then depict (design)." - Brent
 November 2010:
February 2012:


July 2013:


And yes, I am keeping the "watszat":


The tree November 2013:


January 2014:
From the time  posted the last pic I pinched the growth in the upper part the crown heavily to force growth into the lower branches.

This is the tree now in March 2014:


The tree will be potted up in a nicer, but big pot in late winter.

In November I am going to remove the sealant and start working on the deadwood. I am not going to hollow it out too much and I am going to seal it up using a waterproof woodglue that will be colored using oxides.


I could use lime sulfur, which I also tint with oxides, to get some color into deadwood. I paint the deepest carved areas darker etc.

The problem with using lime sulfur is that it reacts with the waterproof woodglue (FB10 sealer) and then the woodglue becomes white and does not stay transparent.

At this stage it is more important to keep the deadwood healthy and dry - this is why I am going to paint in the texture on the deadwood like in a painting. The only reason why I want to do it is to make the tree looking better than it is now - the black sealant I used is a real eyesore.

I am going to let the lowest twigs grow out as much as possible - this species grows up to end of April, so I will get some thickness added to the lower branches. As you can see the growth is pinched heavily.

I will be wiring the upper branches a little bit upward. This tree was styled in my bonsai beginnings and I only thought about flat pads then.

I will probably wire the whole tree in late winter again - it is going to take meters of wire and hours of work - but that is the only way to get some structure/integrity to the design, into a tree.

I am trying my best to let branches cut the trunks so the taper problems can be hidden away.

The tree looks okay from a few sides - a round pot would probably be the best. I do love blue pots.
Repotting into a shallower plastic container:


 The tree today(December 2014):


Saturday, July 27, 2013

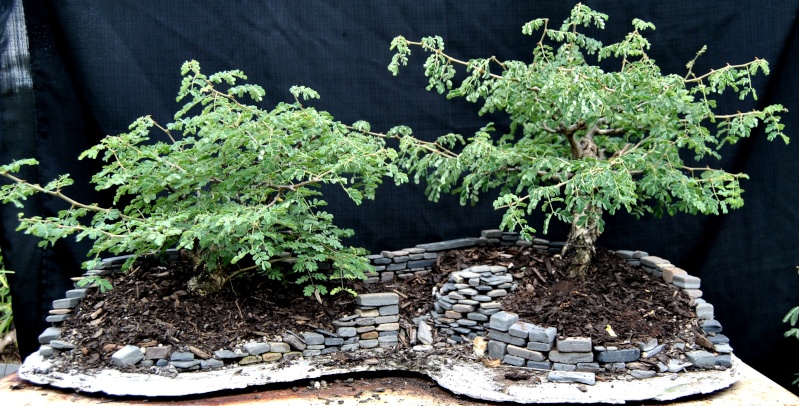
Landscape progression - THIS IS AFRICA.

Being in Africa and to promote African bonsai I am going to do a planting using an African tree species and also a typical ruin found here in Africa.

This is the material I am going to use:
July 2013
 The slab was made by using steel reinforced Rockset.
Here is the first progression pic:


28 January 2014:

Posted Image


March 2014


Tuesday, June 25, 2013

Rockset bonsai pots - an alternative for the creative minds!


Rockset is a product made to have a quick setting cement mixture used to fill brittle holes when using draw-bolts or to fill up cracks in cement floors etc.  "it looks like Quickcrete and DAP are two manufacturer's that have comprable products that are readily availble in the US. And for Canada and the EU one should browse the LaFarge catalogs to see what is offered there. Hydrolic Cement is the right search term to use. And the products labelled for setting machinery, key being that it flows and is a polymer-cementitious composite material is what you need to look for." - Thanks Leo.
It sets in about 30 minutes and have the consistency of condensed milk when mixed correctly.

Here is a few unsealed examples of my experiments with the medium:


Here is a step by step how-to:

1. The Rockset, the FB10 sealer and the the mould - in this case plastic plant pot dripping trays:

 The lip of the inside tray is cut of to make pouring of the Rockset easier.
2. For holes I have used very small dripping trays, but rubber washers or any other flexible material can be used to make removing them later, a bit easier:
 The thickness of the drainage holes stoppers will, in a mould like this, determine the thickness of the pot.
3. The first Rockset is prepared and coloured by using an oxide. A teaspoon is used to drip it where needed. Brushes can also be used - creativity is here the magic word:
4. The second colour:
5. The third colour:
6. Now the inside mould is put in place and a weight placed on top of it to prevent the onside tray from floating on the Rockset:
7. The Rockset is then poured into the space between the two trays. If the cavity is very thin, it is quite difficult to pour the mix without spilling. Rather mix a few small amounts of Rockset at a time because it does sets quickly. The cavity filled up:
8. The curing takes a few hours and the mixture gets quite warm. After about three hours it would be safe to remove the trays. Plastic or aluminum moulds comes free easily. At this stage the top of the pot will be uneven and the top few millimeters will be soft:

  9. The stoppers are now removed and the rim leveled by using a sharp knife first and then sandpaper. If the pot is thick enough a small die grinder may be used to carve a lip if needed.

10. The pot from the side:
11. The pot will be left to dry out overnight. The inside will be brushed to remove any dust and then the whole pot will be painted by using a thin layer of the RB10.

This tree was planted in the sealed pot a few months ago and the pot (a little dirty now)seems to be holding up fine:


Rockset can be used for making slabs also - have fun!


Saturday, June 1, 2013

Ficus sycomorus

English common name: Common Cluster Fig
This is a large evergreen tree (10 – 25m in South Africa, but grow up to 45m in tropical Africa), with
a spreading crown and a yellowish trunk that is usually buttressed. It is the largest indigenous fig in South Africa and is associated with a high watertable, occurring along rivers and on seasonal floodplains throughout the subtropical and tropical regions of Africa.

Some examples of the tree:


The figs are large (25-50mm in diameter), yellow to red when ripe and borne in large, branched bunches on the main trunk and older branches.

The Ficus species of South Africa is grouped as rock-splitters, stranglers and trees and although the
Ficus Sycomorus is grouped under trees and there-fore not as popular as the other two groups for training as bonsai it still produces a fine bonsaitree. The roots are not as strong as the stranglers and rock-splitters but it can be used as root over rock.
 Here is a very nice example of a root over rock by Charles Ceronio:

 The trunk is strong with a greenish color especially when young. With care an excellent taper can be achieved.
 An example of a dug tree with massive taper:

The leaves are large on natural trees but they do reduce in size with the correct training over time, it is more suitable for larger trees.

The Sycomorus likes to be well watered especially in warm summer weather but more sparsely in winter. It is not frost hardy and should be protected in winter in areas receiving frost. It is suited for more informal styles such as informal upright and also root over rock. This tree should be kept outside in full sun to semi shade.
Repotting should take place every one to two years for young trees, and every three to four years for mature specimens. Medium to deep containers are preferred.

Normal fertilizer should be applied at a regular interval.

Heavy pruning should be done during the warm season when healing will be at its best.

Propagation is easily done by cuttings and truncheons.
♣

Monday, April 29, 2013

Buxus bonsai - slow but very rewarding.

My first "finished" bonsai I ever bought was this Buxus:

I bought it in April 2009 as a 10 year old bonsai. I mainly bought it because I had a lot of sticks in pots at that time and I so much wanted to exhibit something at our agricultural show.

This is the tree after I re-potted it December 2010:
Because the tree is so easy to grow I bought another one:

After some wiring and styling:


I really like the tree with it's three trunks - just have to decide on the best front.

Another one I am working on was bought as a nursery tree in November 2010. Here is a pic of the bush in January 2011:
After the first cut back I found a nice single trunk:
After letting it grow out for about three months after the cut back I styled some of the branches:
 From April 2011 I let the tree grow out freely. This is the tree in January 2013:
 I cleaned up the tree a bit and this is the tree after the clean up:
 I am very happy with the trees progression up to January 2013. I will have to be realistic about the outcome of the tree - it will have to be styled femininely.

From that time I have let it grow out again. I will probably have to place the tree a little bit deeper in the pot because of the three thick roots. Over a long time I will get some new roots to replace the current ones.

My personal experience on growing and styling Buxus bonsai:
1.  It seems that the trees grow through the year here in Rustenburg, South Africa.
2.  In my conditions the tree has to be watered every day.
3.  I have not bare rooted any of my Buxus- I yearly alternate removing half of the roots from the bottom and surface roots. I do this in spring.
4. I don't keep the tree heavily pinched. I allow new buds to grow out to about 10cmm before I cut them back. The result is a flush of new growth. In my growing season, almost 9 months long. I can do this cut back about 4-5 times.
5. The tree reacts well to wiring and the branches maintain their wired position after about two months- but be very carefull bending older twigs and branches because they are very brittle. Great care must be taken when bending growth close to old branches/trunks or they may snap off! On new trees I use cable ties on top and below a branches before bending them sharply.
6. When cutting back branches/twigs, do make sure there is some leaves left ot the branch may die.
7. These trees are fed throughout the year by using a mulch.
8. Some of my Buxus are kept in full sun and some get morning sun and dappled shade- in both scenarios they do well.
9. Pest on the trees are not common - I do get some scale during winter time. Malasol rid the trees very quickly of the pest.

Will post more pics soon.